SpringBoot基础
概念
SpringBoot 帮我们简单、快速地创建一个独立的、生产级别的 Spring 应用(说明:SpringBoot底层是Spring)
大多数 SpringBoot 应用只需要编写少量配置即可快速整合 Spring 平台以及第三方技术
特性
快速创建独立 Spring 应用
- SSM:导包、写配置、启动运行
直接嵌入Tomcat、Jetty or Undertow(无需部署 war 包)【Servlet容器】
linux java tomcat mysql: war 放到 tomcat 的 webapps下
jar: java环境: java -jar
重点:提供可选的starter,简化应用整合
场景启动器(starter):web、json、邮件、oss(对象存储)、异步、定时任务、缓存...
导包一堆,控制好版本。
为每一种场景准备了一个依赖; web-starter, mybatis-starter
**重点:**按需自动配置 Spring 以及 第三方库
如果这些场景我要使用(生效)。这个场景的所有配置都会自动配置好。
约定大于配置:每个场景都有很多默认配置。
自定义:配置文件中修改几项就可以
提供生产级特性:如 监控指标、健康检查、外部化配置等
- 监控指标、健康检查(k8s)、外部化配置
无代码生成、无xml
依赖管理机制
思考:
1、为什么导入starter-web所有相关依赖都导入进来?
- 开发什么场景,导入什么场景启动器。
- maven依赖传递原则。A-B-C: A就拥有B和C
- 导入场景启动器。场景启动器:自动把这个场景的所有核心依赖全部导入进来
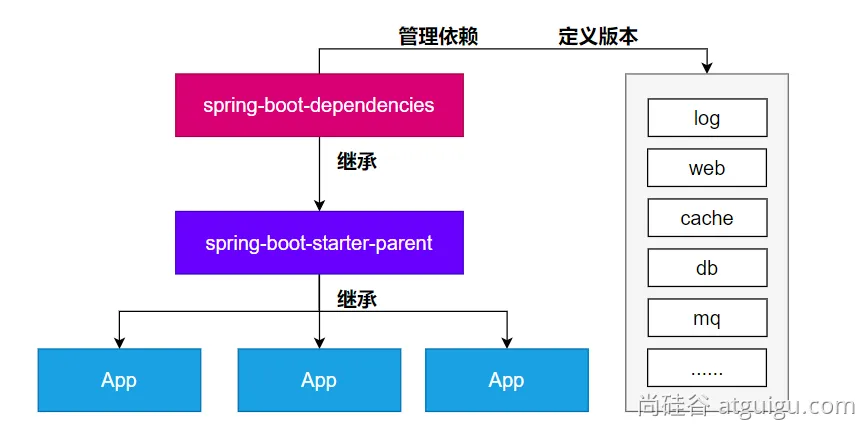
2、为什么版本号都不用写?
- 每个boot项目都有一个父项目
spring-boot-starter-parent - parent的父项目是
spring-boot-dependencies - 父项目 版本仲裁中心,把所有常见的jar的依赖版本都声明好了。
- 比如:
mysql-connector-j
3、自定义版本号
- 利用maven的就近原则
- 直接在当前项目properties标签中声明父项目用的版本属性的key
- 直接在导入依赖的时候声明版本
4、第三方的jar包
- boot父项目没有管理的需要自行声明好
<!-- https://mvnrepository.com/artifact/com.alibaba/druid -->
<dependency>
  <groupId>com.alibaba</groupId>
  <artifactId>druid</artifactId>
  <version>1.2.16</version>
</dependency>
自动配置机制
public static void main(String[] args) {

  //java10: 局部变量类型的自动推断
  var ioc = SpringApplication.run(MainApplication.class, args);

  //1、获取容器中所有组件的名字
  String[] names = ioc.getBeanDefinitionNames();
  //2、挨个遍历:
  // dispatcherServlet、beanNameViewResolver、characterEncodingFilter、multipartResolver
  // SpringBoot把以前配置的核心组件现在都给我们自动配置好了。
  for (String name : names) {
      System.out.println(name);
  }
}
默认的包扫描规则
@SpringBootApplication标注的类就是主程序类SpringBoot只会扫描主程序所在的包及其下面的子包,自动的component-scan功能
自定义扫描路径
@SpringBootApplication(scanBasePackages = "com.xx")
@ComponentScan("com.xxx")直接指定扫描的路径
配置默认值
配置文件的所有配置项是和某个类的对象值进行一一绑定的。
绑定了配置文件中每一项值的类: 属性类。
比如:
ServerProperties绑定了所有Tomcat服务器有关的配置MultipartProperties绑定了所有文件上传相关的配置....参照官方文档:或者参照 绑定的 属性类。
按需加载自动配置
导入场景
spring-boot-starter-web场景启动器除了会导入相关功能依赖,还会导入一个
spring-boot-starter,是所有starter的starter,基础核心starterspring-boot-starter导入了一个包spring-boot-autoconfigure。包里面都是各种场景的AutoConfiguration自动配置类虽然全场景的自动配置都在
spring-boot-autoconfigure这个包,但是不是全都开启的。- 导入哪个场景就开启哪个自动配置
总结: 导入场景启动器、触发 spring-boot-autoconfigure这个包的自动配置生效、容器中就会具有相关场景的功能
完整流程
思考:
1、SpringBoot怎么实现导一个**starter**、写一些简单配置,应用就能跑起来,我们无需关心整合
2、为什么Tomcat的端口号可以配置在application.properties中,并且Tomcat能启动成功?
3、导入场景后哪些自动配置能生效?
自动配置流程细节梳理:
**1、**导入starter-web:导入了web开发场景
- 1、场景启动器导入了相关场景的所有依赖:
starter-json、starter-tomcat、springmvc - 2、每个场景启动器都引入了一个
spring-boot-starter,核心场景启动器。 - 3、核心场景启动器引入了
spring-boot-autoconfigure包。 - 4、
spring-boot-autoconfigure里面囊括了所有场景的所有配置。 - 5、只要这个包下的所有类都能生效,那么相当于SpringBoot官方写好的整合功能就生效了。
- 6、SpringBoot默认却扫描不到
spring-boot-autoconfigure下写好的所有配置类。(这些配置类给我们做了整合操作),默认只扫描主程序所在的包。
2、 主程序:@SpringBootApplication
1、
@SpringBootApplication由三个注解组成@SpringBootConfiguration、@EnableAutoConfiguratio、@ComponentScan2、SpringBoot默认只能扫描自己主程序所在的包及其下面的子包,扫描不到
spring-boot-autoconfigure包中官方写好的配置类3、
@EnableAutoConfiguration:SpringBoot 开启自动配置的核心。是由
@Import(AutoConfigurationImportSelector.class)提供功能:批量给容器中导入组件。SpringBoot启动会默认加载 142个配置类。
这142个配置类来自于
spring-boot-autoconfigure下META-INF/spring/**org.springframework.boot.autoconfigure.AutoConfiguration**.imports文件指定的项目启动的时候利用 @Import 批量导入组件机制把
autoconfigure包下的142xxxxAutoConfiguration类导入进来(自动配置类)虽然导入了
142个自动配置类,并不是这142个自动配置类都能生效
4、按需生效:
- 每一个自动配置类,都有条件注解
@ConditionalOnxxx,只有条件成立,才能生效
- 每一个自动配置类,都有条件注解
3、xxxxAutoConfiguration自动配置类
- 1、给容器中使用@Bean 放一堆组件。
- 2、每个自动配置类都可能有这个注解
@EnableConfigurationProperties(ServerProperties.class),用来把配置文件中配的指定前缀的属性值封装到xxxProperties属性类中 - 3、以Tomcat为例:把服务器的所有配置都是以
server开头的。配置都封装到了属性类中。 - 4、给容器中放的所有组件的一些核心参数,都来自于
**xxxProperties**。**xxxProperties**都是和配置文件绑定。 - 只需要改配置文件的值,核心组件的底层参数都能修改
**4、**写业务,全程无需关心各种整合(底层这些整合写好了,而且也生效了)
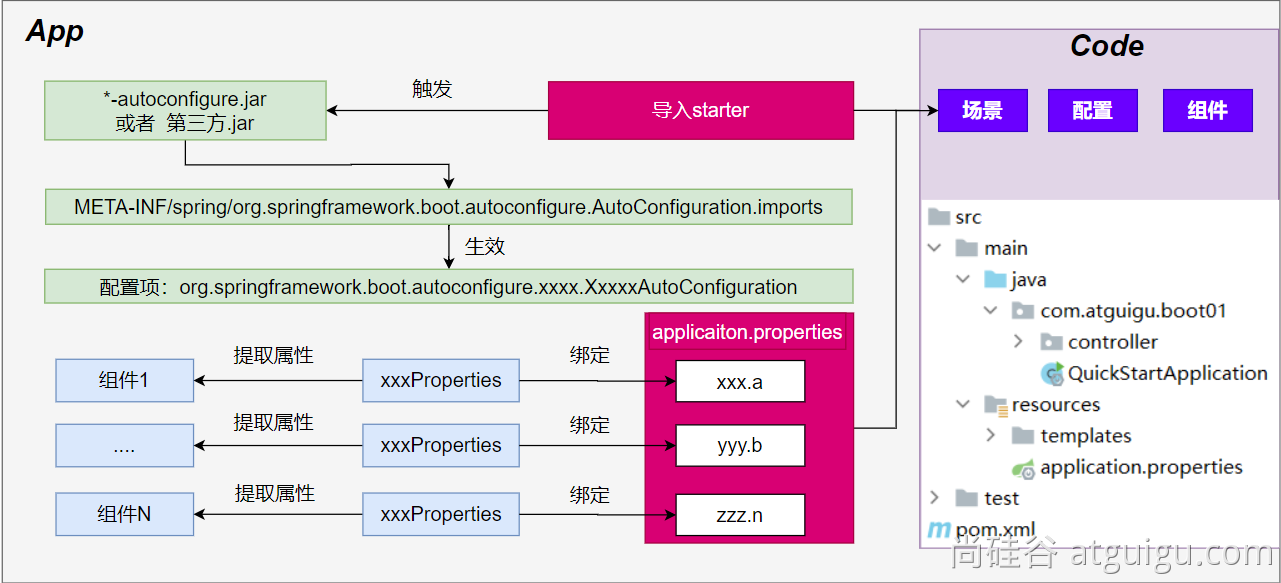
核心流程总结:
1、导入starter,就会导入autoconfigure包。
2、autoconfigure 包里面 有一个文件 META-INF/spring/org.springframework.boot.autoconfigure.AutoConfiguration.imports,里面指定的所有启动要加载的自动配置类
3、@EnableAutoConfiguration 会自动的把上面文件里面写的所有自动配置类都导入进来。xxxAutoConfiguration 是有条件注解进行按需加载
4、xxxAutoConfiguration给容器中导入一堆组件,组件都是从 xxxProperties中提取属性值
5、xxxProperties又是和配置文件进行了绑定
**效果:**导入starter、修改配置文件,就能修改底层行为。
条件注解
如果注解指定的条件成立,则触发指定行为
@ConditionalOnXxx
@ConditionalOnClass:如果类路径中存在这个类,则触发指定行为
@ConditionalOnMissingClass:如果类路径中不存在这个类,则触发指定行为
@ConditionalOnBean:如果容器中存在这个Bean(组件),则触发指定行为
@ConditionalOnMissingBean:如果容器中不存在这个Bean(组件),则触发指定行为
@ConditionalOnBean(value=组件类型,name=组件名字):判断容器中是否有这个类型的组件,并且名字是指定的值
@ConditionalOnRepositoryType (org.springframework.boot.autoconfigure.data) @ConditionalOnDefaultWebSecurity (org.springframework.boot.autoconfigure.security) @ConditionalOnSingleCandidate (org.springframework.boot.autoconfigure.condition) @ConditionalOnWebApplication (org.springframework.boot.autoconfigure.condition) @ConditionalOnWarDeployment (org.springframework.boot.autoconfigure.condition) @ConditionalOnJndi (org.springframework.boot.autoconfigure.condition) @ConditionalOnResource (org.springframework.boot.autoconfigure.condition) @ConditionalOnExpression (org.springframework.boot.autoconfigure.condition) @ConditionalOnClass (org.springframework.boot.autoconfigure.condition) @ConditionalOnEnabledResourceChain (org.springframework.boot.autoconfigure.web) @ConditionalOnMissingClass (org.springframework.boot.autoconfigure.condition) @ConditionalOnNotWebApplication (org.springframework.boot.autoconfigure.condition) @ConditionalOnProperty (org.springframework.boot.autoconfigure.condition) @ConditionalOnCloudPlatform (org.springframework.boot.autoconfigure.condition) @ConditionalOnBean (org.springframework.boot.autoconfigure.condition) @ConditionalOnMissingBean (org.springframework.boot.autoconfigure.condition) @ConditionalOnMissingFilterBean (org.springframework.boot.autoconfigure.web.servlet) @Profile (org.springframework.context.annotation) @ConditionalOnInitializedRestarter (org.springframework.boot.devtools.restart) @ConditionalOnGraphQlSchema (org.springframework.boot.autoconfigure.graphql) @ConditionalOnJava (org.springframework.boot.autoconfigure.condition)
属性绑定
@ConfigurationProperties: 声明组件的属性和配置文件哪些前缀开始项进行绑定(使用这个的前提是该类已经被注册为bean)
@EnableConfigurationProperties:快速注册注解:
- **场景:**SpringBoot默认只扫描自己主程序所在的包。如果导入第三方包,即使组件上标注了 @Component、@ConfigurationProperties 注解,也没用。因为组件都扫描不进来,此时使用这个注解就可以快速进行属性绑定并把组件注册进容器
将容器中任意组件(Bean)的属性值和配置文件的配置项的值进行绑定
- 给容器中注册组件(@Component、@Bean)
- 使用@ConfigurationProperties 声明组件和配置文件的哪些配置项进行绑定
或者
- 使用@ConfigurationProperties 声明组件和配置文件的哪些配置项进行绑定
- 然后使用@EnableConfigurationProperties将上一步声明的类注册为组件,并完成属性绑定
日志
SpringBoot怎么把日志默认配置好的
1、每个starter场景,都会导入一个核心场景spring-boot-starter
2、核心场景引入了日志的所用功能spring-boot-starter-logging
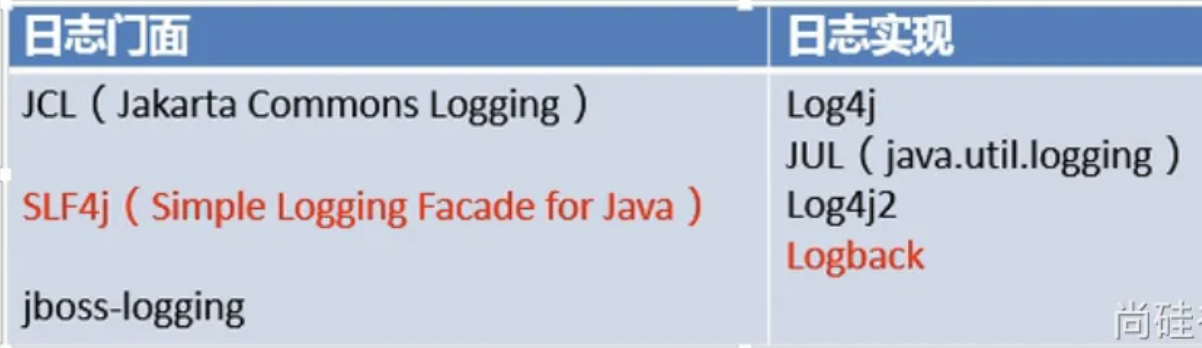
3、默认使用了logback + slf4j 组合作为默认底层日志
4、日志是系统一启动就要用,xxxAutoConfiguration是系统启动好了以后放好的组件,后来用的。
5、日志是利用监听器机制配置好的。ApplicationListener。
6、日志所有的配置都可以通过修改配置文件实现。以logging开始的所有配置。
日志格式
2023-03-31T13:56:17.511+08:00  INFO 4944 --- [           main] o.apache.catalina.core.StandardService   : Starting service [Tomcat]
2023-03-31T13:56:17.511+08:00  INFO 4944 --- [           main] o.apache.catalina.core.StandardEngine    : Starting Servlet engine: [Apache Tomcat/10.1.7]
默认输出格式:
- 时间和日期:毫秒级精度
- 日志级别:ERROR, WARN, INFO, DEBUG, or TRACE.
- 进程 ID
- ---: 消息分割符
- 线程名: 使用[]包含
- Logger 名: 通常是产生日志的类名
- 消息: 日志记录的内容
注意: logback 没有FATAL级别,对应的是ERROR
使用日志
Logger logger = LoggerFactory.getLogger(getClass());

或者使用Lombok的@Slf4j注解,会自动为当前类注入一个log属性
日志级别
由低到高:
ALL,TRACE, DEBUG, INFO, WARN, ERROR,FATAL,OFF;只会打印指定级别及以上级别的日志ALL:打印所有日志
TRACE:追踪框架详细流程日志,一般不使用
DEBUG:开发调试细节日志
INFO:关键、感兴趣信息日志
WARN:警告但不是错误的信息日志,比如:版本过时
ERROR:业务错误日志,比如出现各种异常
FATAL:致命错误日志,比如jvm系统崩溃
OFF:关闭所有日志记录
不指定级别的所有类,都使用root指定的级别作为默认级别
SpringBoot日志默认级别是 INFO
- 在
application.properties/yaml中配置logging.level.<logger-name>=<level>指定日志级别 - level可取值范围:
TRACE, DEBUG, INFO, WARN, ERROR, FATAL, or OFF,定义在LogLevel类中 - root 的
logger-name叫root,可以配置logging.level.root=warn,代表所有未指定日志级别都使用 root 的 warn 级别
日志分组
比较有用的技巧是:
将相关的logger分组在一起,统一配置。SpringBoot 也支持。比如:Tomcat 相关的日志统一设置
logging.group.tomcat=org.apache.catalina,org.apache.coyote,org.apache.tomcat
logging.level.tomcat=trace
SpringBoot 预定义两个组
| Name | Loggers |
|---|---|
| web | org.springframework.core.codec, org.springframework.http, org.springframework.web, org.springframework.boot.actuate.endpoint.web, org.springframework.boot.web.servlet.ServletContextInitializerBeans |
| sql | org.springframework.jdbc.core, org.hibernate.SQL, org.jooq.tools.LoggerListener |
日志文件输出
SpringBoot 默认只把日志写在控制台,如果想额外记录到文件,可以在application.properties中添加logging.file.name or logging.file.path配置项。
| logging.file.name | logging.file.path | 示例 | 效果 |
|---|---|---|---|
| 未指定 | 未指定 | 仅控制台输出 | |
| 指定 | 未指定 | my.log | 写入指定文件。可以加路径 |
| 未指定 | 指定 | /var/log | 写入指定目录,文件名为spring.log |
| 指定 | 指定 | 以logging.file.name为准 |
日志文件归档和滚动切割
归档:每天的日志单独存到一个文档中。
切割:每个文件10MB,超过大小切割成另外一个文件。
- 每天的日志应该独立分割出来存档。如果使用logback(SpringBoot 默认整合),可以通过application.properties/yaml文件指定日志滚动规则。
- 如果是其他日志系统,需要自行配置(添加log4j2.xml或log4j2-spring.xml)
- 支持的滚动规则设置如下
| 配置项 | 描述 |
|---|---|
| logging.logback.rollingpolicy.file-name-pattern | 日志存档的文件名格式(默认值:${LOG_FILE}.%d{yyyy-MM-dd}.%i.gz) |
| logging.logback.rollingpolicy.clean-history-on-start | 应用启动时是否清除以前存档(默认值:false) |
| logging.logback.rollingpolicy.max-file-size | 存档前,每个日志文件的最大大小(默认值:10MB) |
| logging.logback.rollingpolicy.total-size-cap | 日志文件被删除之前,可以容纳的最大大小(默认值:0B)。设置1GB则磁盘存储超过 1GB 日志后就会删除旧日志文件 |
| logging.logback.rollingpolicy.max-history | 日志文件保存的最大天数(默认值:7). |
自定义配置
通常我们配置 application.properties 就够了。当然也可以自定义。比如:
| 日志系统 | 自定义 |
|---|---|
| Logback | logback-spring.xml, logback-spring.groovy, logback.xml, or logback.groovy |
| Log4j2 | log4j2-spring.xml or log4j2.xml |
| JDK (Java Util Logging) | logging.properties |
如果可能,建议在日志配置中使用-spring 变量(例如,logback-spring.xml 而不是 logback.xml)。如果使用标准配置文件,spring 无法完全控制日志初始化。最佳实战:自己要写配置,配置文件名加上 xx-spring.xml
切换日志组合
先排除已有的,然后引入自己的
<dependency>
    <groupId>org.springframework.boot</groupId>
    <artifactId>spring-boot-starter-web</artifactId>
</dependency>
<dependency>
    <groupId>org.springframework.boot</groupId>
    <artifactId>spring-boot-starter</artifactId>
    <exclusions>
        <exclusion>
            <groupId>org.springframework.boot</groupId>
            <artifactId>spring-boot-starter-logging</artifactId>
        </exclusion>
    </exclusions>
</dependency>
<dependency>
    <groupId>org.springframework.boot</groupId>
    <artifactId>spring-boot-starter-log4j2</artifactId>
</dependency>
log4j2支持yaml和json格式的配置文件
| 格式 | 依赖 | 文件名 |
|---|---|---|
| YAML | com.fasterxml.jackson.core:jackson-databind + com.fasterxml.jackson.dataformat:jackson-dataformat-yaml | log4j2.yaml + log4j2.yml |
| JSON | com.fasterxml.jackson.core:jackson-databind | log4j2.json + log4j2.jsn |
springboot-web开发
SpringBoot的Web开发能力,由SpringMVC提供。
WebMvcAutoConfiguration原理
生效条件
@AutoConfiguration(after = { DispatcherServletAutoConfiguration.class, TaskExecutionAutoConfiguration.class,
		ValidationAutoConfiguration.class }) //在这些自动配置之后
@ConditionalOnWebApplication(type = Type.SERVLET) //如果是web应用就生效,类型SERVLET、REACTIVE 响应式web
@ConditionalOnClass({ Servlet.class, DispatcherServlet.class, WebMvcConfigurer.class })
@ConditionalOnMissingBean(WebMvcConfigurationSupport.class) //容器中没有这个Bean,才生效。默认就是没有
@AutoConfigureOrder(Ordered.HIGHEST_PRECEDENCE + 10)//优先级
@ImportRuntimeHints(WebResourcesRuntimeHints.class)
public class WebMvcAutoConfiguration {
}
效果
WebMvcAutoConfiguration主要结构如下:
放了两个Filter
HiddenHttpMethodFilter;页面表单提交Rest请求(GET、POST、PUT、DELETE)FormContentFilter: 表单内容Filter,GET(数据放URL后面)、POST(数据放请求体)请求可以携带数据,PUT、DELETE 的请求体数据会被忽略,这个filter则提供了该支持
给容器中放了
WebMvcConfigurer组件;给SpringMVC添加各种定制功能,和springboot配置的默认行为所有的功能最终会和配置文件进行绑定
WebMvcProperties:
spring.mvc配置文件WebProperties:
spring.web配置文件@Configuration(proxyBeanMethods = false) @Import(EnableWebMvcConfiguration.class) //额外导入了其他配置 @EnableConfigurationProperties({ WebMvcProperties.class, WebProperties.class }) @Order(0) public static class WebMvcAutoConfigurationAdapter implements WebMvcConfigurer, ServletContextAware{ }
还有一个EnableWebMvcConfiguration类:配置一些额外功能可以看作是上一个接口功能的补充,比如:欢迎页,静态资源前缀
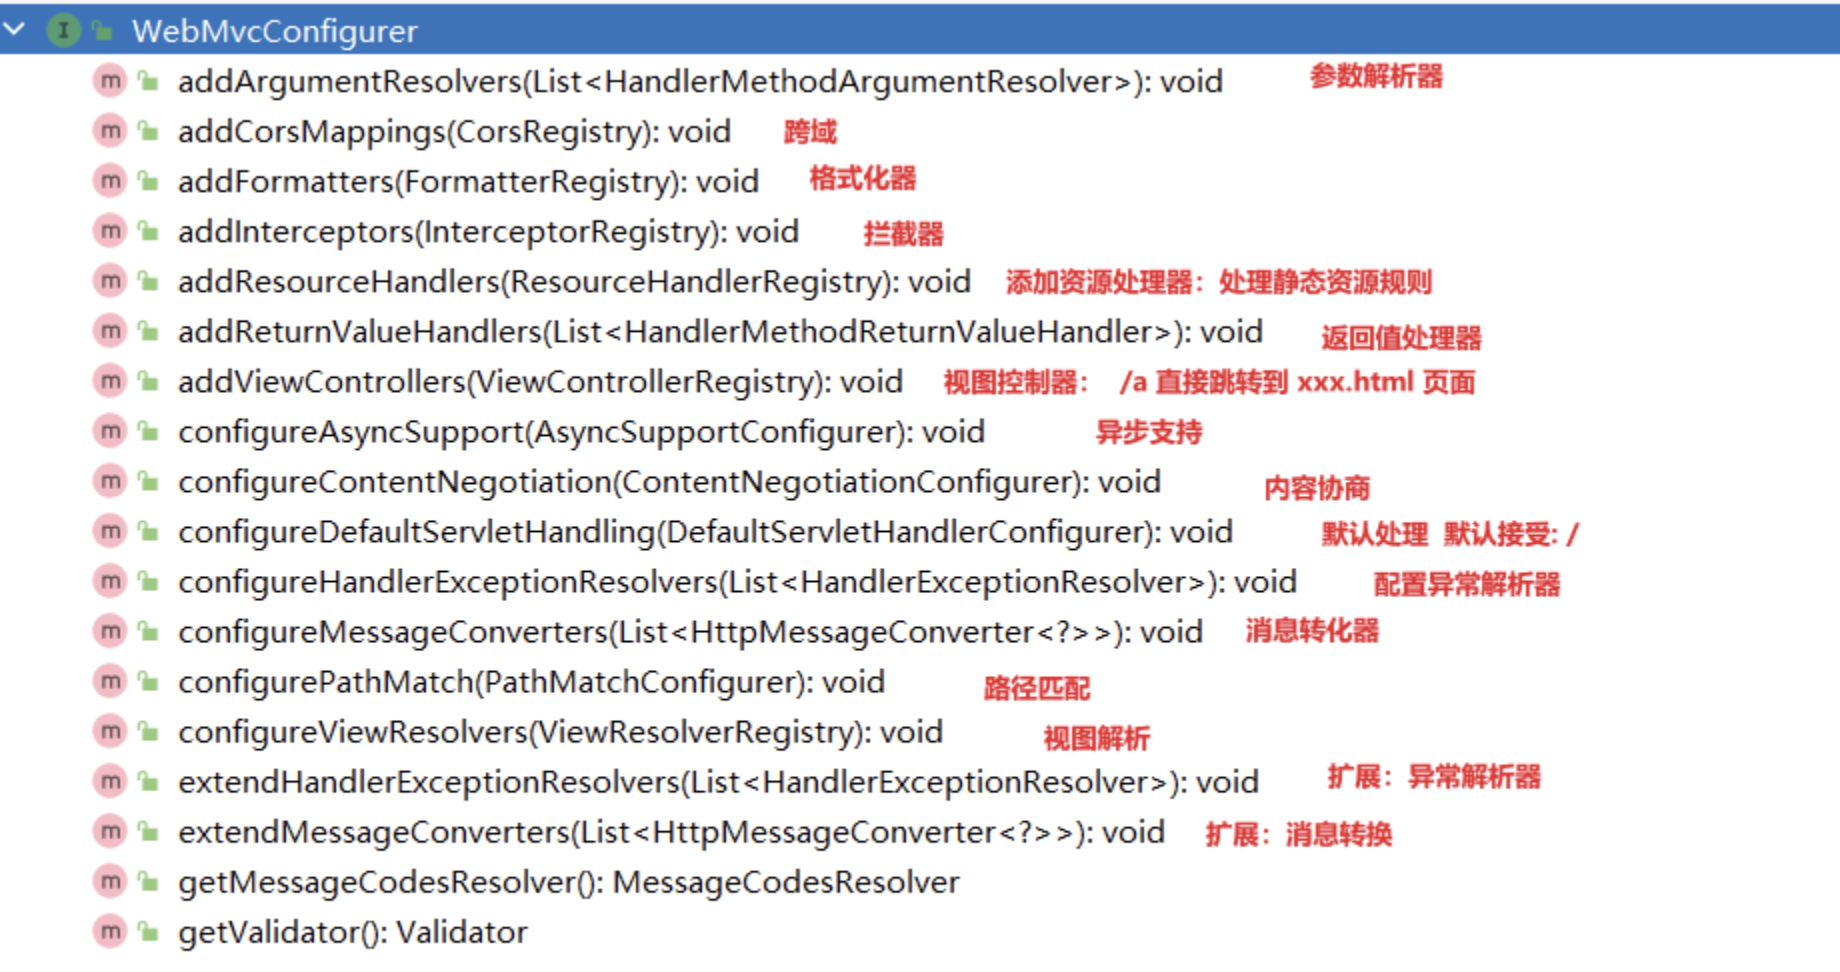
WebMvcConfigurer接口
提供了配置SpringMVC底层的所有组件入口
静态资源规则源码
@Override
public void addResourceHandlers(ResourceHandlerRegistry registry) {
    if (!this.resourceProperties.isAddMappings()) {
        logger.debug("Default resource handling disabled");
        return;
    }
    addResourceHandler(registry, this.mvcProperties.getWebjarsPathPattern(),
            "classpath:/META-INF/resources/webjars/");
    addResourceHandler(registry, this.mvcProperties.getStaticPathPattern(), (registration) -> {
        registration.addResourceLocations(this.resourceProperties.getStaticLocations());
        if (this.servletContext != null) {
            ServletContextResource resource = new ServletContextResource(this.servletContext, SERVLET_LOCATION);
            registration.addResourceLocations(resource);
        }
    });
}
- 规则一:访问:
/webjars/**路径就去classpath:/META-INF/resources/webjars/下找资源. - 规则二:访问:
/**路径就去静态资源默认的四个位置找资源classpath:/META-INF/resources/classpath:/resources/classpath:/static/classpath:/public/
- 规则三:静态资源默认都有缓存规则的设置
- 所有缓存的设置,直接通过配置文件:
spring.web - cachePeriod: 缓存周期; 多久不用找服务器要新的。 默认没有,以s为单位
- cacheControl: HTTP缓存控制;https://developer.mozilla.org/zh-CN/docs/Web/HTTP/Caching
- useLastModified:是否使用最后一次修改。配合HTTP Cache规则
- 所有缓存的设置,直接通过配置文件:
如果浏览器访问了一个静态资源
index.js,如果服务这个资源没有发生变化,下次访问的时候就可以直接让浏览器用自己缓存中的东西,而不用给服务器发请求。
registration.setCachePeriod(getSeconds(this.resourceProperties.getCache().getPeriod()));
registration.setCacheControl(this.resourceProperties.getCache().getCachecontrol().toHttpCacheControl());
registration.setUseLastModified(this.resourceProperties.getCache().isUseLastModified());
EnableWebMvcConfiguration 源码
//SpringBoot 给容器中放 WebMvcConfigurationSupport 组件。
//我们如果自己放了 WebMvcConfigurationSupport 组件,Boot的WebMvcAutoConfiguration都会失效。
@Configuration(proxyBeanMethods = false)
@EnableConfigurationProperties(WebProperties.class)
public static class EnableWebMvcConfiguration extends DelegatingWebMvcConfiguration implements ResourceLoaderAware {}
HandlerMapping: 根据请求路径/a找那个handler能处理请求WelcomePageHandlerMapping:访问
/**路径下的所有请求,都在以前四个静态资源路径下找,欢迎页也一样找
index.html:只要静态资源的位置有一个index.html页面,项目启动默认访问
为什么容器中放一个WebMvcConfigurer就能配置底层行为
- WebMvcAutoConfiguration 是一个自动配置类,它里面有一个
EnableWebMvcConfiguration EnableWebMvcConfiguration继承与DelegatingWebMvcConfiguration,这两个都生效DelegatingWebMvcConfiguration利用 DI 把容器中 所有WebMvcConfigurer注入进来- 别人调用
DelegatingWebMvcConfiguration的方法配置底层规则,而它调用所有WebMvcConfigurer的配置底层方法。
WebMvcConfigurationSupport
提供了很多的默认设置。
判断系统中是否有相应的类:如果有,就加入相应的HttpMessageConverter
jackson2Present = ClassUtils.isPresent("com.fasterxml.jackson.databind.ObjectMapper", classLoader) &&
				ClassUtils.isPresent("com.fasterxml.jackson.core.JsonGenerator", classLoader);
jackson2XmlPresent = ClassUtils.isPresent("com.fasterxml.jackson.dataformat.xml.XmlMapper", classLoader);
jackson2SmilePresent = ClassUtils.isPresent("com.fasterxml.jackson.dataformat.smile.SmileFactory", classLoader);
Web默认配置
整合web后:
<dependency>
    <groupId>org.springframework.boot</groupId>
    <artifactId>spring-boot-starter-web</artifactId>
</dependency>
SpringMVC自动配置场景给我们配置了如下所有默认行为
WebMvcAutoConfigurationweb场景的自动配置类- 支持RESTful的filter:HiddenHttpMethodFilter
- 支持非POST请求,请求体携带数据:FormContentFilter
- 导入**
EnableWebMvcConfiguration**:RequestMappingHandlerAdapterWelcomePageHandlerMapping: 欢迎页功能支持(模板引擎目录、静态资源目录放index.html),项目访问/ 就默认展示这个页面.RequestMappingHandlerMapping:找每个请求由谁处理的映射关系ExceptionHandlerExceptionResolver:默认的异常解析器LocaleResolver:国际化解析器ThemeResolver:主题解析器FlashMapManager:临时数据共享FormattingConversionService: 数据格式化 、类型转化Validator: 数据校验JSR303提供的数据校验功能WebBindingInitializer:请求参数的封装与绑定ContentNegotiationManager:内容协商管理器
- **
WebMvcAutoConfigurationAdapter**配置生效,它是一个WebMvcConfigurer,定义mvc底层组件- 定义好
WebMvcConfigurer底层组件默认功能; - 视图解析器:
InternalResourceViewResolver - 视图解析器:
BeanNameViewResolver,**视图名(controller方法的返回值字符串)**就是组件名 - 内容协商解析器:
ContentNegotiatingViewResolver - 请求上下文过滤器:
RequestContextFilter: 任意位置直接获取当前请求 - 静态资源链规则
ProblemDetailsExceptionHandler:错误详情- SpringMVC内部场景异常被它捕获:
- 定义好
- 定义了MVC默认的底层行为:
WebMvcConfigurer
重要:
- 如果想保持boot mvc 的默认配置,并且自定义更多的 mvc 配置,如:interceptors,formatters,view controllers 等。可以使用@Configuration注解添加一个WebMvcConfigurer 类型的配置类,并不要标注 @EnableWebMvc
- 如果想保持 boot mvc 的默认配置,但要自定义核心组件实例,比如:RequestMappingHandlerMapping, RequestMappingHandlerAdapter, 或ExceptionHandlerExceptionResolver,给容器中放一个 WebMvcRegistrations 组件即可
- 如果想全面接管 Spring MVC,@Configuration 标注一个配置类,并加上@EnableWebMvc注解,实现 WebMvcConfigurer 接口
@ConditionalOnMissingBean(WebMvcConfigurationSupport.class)从这里可以看出,只有我们没有注册该组件,springboot才会去创建他的web自动配置,他的默认配置才会生效,比如静态资源访问等等
而@EnableWebMvc注导入了@Import({DelegatingWebMvcConfiguration.class}),该类是WebMvcConfigurationSupport.class的子类,所以一旦我们使用了该注解,springboot为我们做的工作就不会生效了(但是处理请求之类的还是可以访问,这些不属于springboot做的工作,是springmvc做的工作)
静态资源映射
默认配置
静态资源映射规则在 WebMvcAutoConfiguration 中进行了定义:
/webjars/**的所有路径 资源都在classpath:/META-INF/resources/webjars//**的所有路径 资源都在classpath:/META-INF/resources/、classpath:/resources/、classpath:/static/、classpath:/public/
静态资源缓存
- 所有静态资源都定义了缓存规则。【浏览器访问过一次,就会缓存一段时间】,但此功能参数无默认值
period: 缓存间隔。 默认 0S;cacheControl:缓存控制。 默认无;useLastModified:是否使用lastModified头。 默认 false;
欢迎页
欢迎页规则在 WebMvcAutoConfiguration 中进行了定义:
在静态资源目录下找 index.html
没有就在 templates下找index模板页
Favicon
- 在静态资源目录下找 favicon.ico
自定义配置
配置文件
#开启静态资源映射规则,默认true
spring.web.resources.add-mappings=true

#设置缓存
#spring.web.resources.cache.period=3600
##缓存详细合并项控制,覆盖period配置:
## 浏览器第一次请求服务器,服务器告诉浏览器此资源缓存7200秒,7200秒以内的所有此资源访问不用发给服务器请求,7200秒以后发请求给服务器
spring.web.resources.cache.cachecontrol.max-age=7200
#使用资源 last-modified 时间,来对比服务器和浏览器的资源是否相同没有变化。相同返回 304
spring.web.resources.cache.use-last-modified=true

#自定义静态资源文件夹位置
spring.web.resources.static-locations=classpath:/a/,classpath:/b/,classpath:/static/

#2、 spring.mvc
## 2.1. 自定义webjars路径前缀
spring.mvc.webjars-path-pattern=/wj/**
## 2.2. 静态资源访问路径前缀,浏览器访问时,需要加static
spring.mvc.static-path-pattern=/static/**
配置类(注意不要使用@EnableWebMvc)
@Configuration // 这是一个配置类,直接继承 WebMvcConfigurer
public class MyConfig implements WebMvcConfigurer {
    @Override
    public void addResourceHandlers(ResourceHandlerRegistry registry) {
        //保留以前规则
        //自己写新的规则。
        registry.addResourceHandler("/static/**")
                .addResourceLocations("classpath:/a/","classpath:/b/")
                .setCacheControl(CacheControl.maxAge(1180, TimeUnit.SECONDS));
    }
}
或者
@Configuration // 这是一个配置类,给容器中放一个 WebMvcConfigurer 组件,就能自定义底层
public class MyConfig {
    @Bean
    public WebMvcConfigurer webMvcConfigurer(){
        return new WebMvcConfigurer() {
            @Override
            public void addResourceHandlers(ResourceHandlerRegistry registry) {
                registry.addResourceHandler("/static/**")
                        .addResourceLocations("classpath:/a/", "classpath:/b/")
                        .setCacheControl(CacheControl.maxAge(1180, TimeUnit.SECONDS));
            }
        };
    }
}
路径匹配规则
Spring5.3 之后加入了更多的请求路径匹配的实现策略;
以前只支持 AntPathMatcher 策略, 现在提供了 PathPatternParser 策略。并且可以让我们指定到底使用那种策略。
Ant 风格的路径模式语法具有以下规则:
- *:表示任意数量的字符。
- ?:表示任意一个字符。
- :表示任意数量的目录。
- {}:表示一个命名的模式占位符。
- []:表示字符集合,例如[a-z]表示小写字母。
例如:
- *.html 匹配任意名称,扩展名为.html的文件。
- /folder1/* / *.java 匹配在folder1目录下的任意两级目录下的.java文件。
- /folder2/** / *.jsp 匹配在folder2目录下任意目录深度的.jsp文件。
- /{type}/{id}.html 匹配任意文件名为{id}.html,在任意命名的{type}目录下的文件。
注意:Ant 风格的路径模式语法中的特殊字符需要转义,如:
- 要匹配文件路径中的星号,则需要转义为\ \ *。
- 要匹配文件路径中的问号,则需要转义为\ \ ?。
AntPathMatcher 与 PathPatternParser
- PathPatternParser 在 jmh 基准测试下,有 6~8 倍吞吐量提升,降低 30%~40%空间分配率
- PathPatternParser 兼容 AntPathMatcher 语法,并支持更多类型的路径模式
- PathPatternParser "**" 多段匹配的支持仅允许在模式末尾使用
总结:
- 使用默认的路径匹配规则,是由 PathPatternParser 提供的
- 如果路径中间需要有 **,替换成ant风格路径
# 改变路径匹配策略:
# ant_path_matcher 老版策略;
# path_pattern_parser 新版策略;
spring.mvc.pathmatch.matching-strategy=ant_path_matcher
内容协商
概念
@ResponseBody由HttpMessageConverter处理
SpringBoot 多端内容适配。
- 基于请求头内容协商:(默认开启)
- 客户端向服务端发送请求,携带HTTP标准的Accept请求头。
- Accept:
application/json、text/xml、text/yaml - 服务端根据客户端请求头期望的数据类型进行动态返回
基于请求参数内容协商**:(需要开启)**
- 发送请求 GET /projects/spring-boot?format=json
- 匹配到 @GetMapping("/projects/spring-boot")
- 根据参数协商,优先返回 json 类型数据【需要开启参数匹配设置】
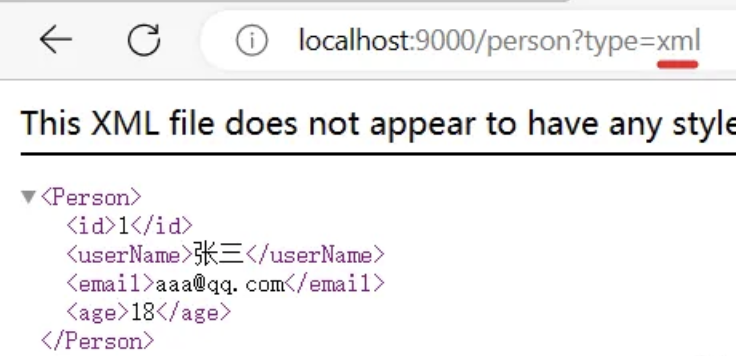
- 发送请求 GET /projects/spring-boot?format=xml,优先返回 xml 类型数据
xml
请求同一个接口,可以返回json和xml不同格式数据
引入支持写出xml内容依赖
<dependency>
  <groupId>com.fasterxml.jackson.dataformat</groupId>
  <artifactId>jackson-dataformat-xml</artifactId>
</dependency>
标注注解
@JacksonXmlRootElement  // 可以写出为xml文档
@Data
public class Person {
  private Long id;
  private String userName;
  private String email;
  private Integer age;
}
开启基于请求参数的内容协商
# 开启基于请求参数的内容协商功能。 默认参数名:format。 默认此功能不开启
spring.mvc.contentnegotiation.favor-parameter=true
# 指定内容协商时使用的参数名。默认是 format
spring.mvc.contentnegotiation.parameter-name=type
大多数 MediaType 都是开箱即用的。也可以自定义内容类型,这种就需要自己写HttpMessageConveter
spring.mvc.contentnegotiation.media-types.yaml=text/yaml
Yaml
导入依赖
<dependency>
    <groupId>com.fasterxml.jackson.dataformat</groupId>
    <artifactId>jackson-dataformat-yaml</artifactId>
</dependency>
编写配置
#新增一种媒体类型
spring.mvc.contentnegotiation.media-types.yaml=text/yaml
增加HttpMessageConverter组件,专门负责把对象写出为yaml格式,HttpMessageConverter的示例写法
public class MyYamlHttpMessageConverter extends AbstractHttpMessageConverter<Object> {

    private ObjectMapper objectMapper = null; //把对象转成yaml

    public MyYamlHttpMessageConverter(){
        //告诉SpringBoot这个MessageConverter支持哪种媒体类型  //媒体类型
        super(new MediaType("text", "yaml", Charset.forName("UTF-8")));
        YAMLFactory factory = new YAMLFactory()
                .disable(YAMLGenerator.Feature.WRITE_DOC_START_MARKER);
        this.objectMapper = new ObjectMapper(factory);
    }

    @Override
    protected boolean supports(Class<?> clazz) {
        //只要是对象类型,不是基本类型
        return true;
    }

    @Override  //@RequestBody
    protected Object readInternal(Class<?> clazz, HttpInputMessage inputMessage) throws IOException, HttpMessageNotReadableException {
        return null;
    }

    @Override //@ResponseBody 把对象怎么写出去
    protected void writeInternal(Object methodReturnValue, HttpOutputMessage outputMessage) throws IOException, HttpMessageNotWritableException {
        //try-with写法,自动关流
        try(OutputStream os = outputMessage.getBody()){
            this.objectMapper.writeValue(os,methodReturnValue);
        }
    }
}
错误处理
错误处理的自动配置都在ErrorMvcAutoConfiguration中,两大核心机制:
- SpringBoot 会自适应处理错误,响应页面或JSON数据
- SpringMVC的错误处理机制依然保留,MVC处理不了,才会交给boot进行处理

前后端分离项目:使用@ControllerAdvice + @ExceptionHandler 进行统一异常处理,返回json数据即可
Profiles环境
注解使用
容器中所有组件均可以使用@Profile注解来标记该组件生效的环境,如果不配置,默认是所有环境都生效
环境激活
# 存在一个默认环境default
# spring.profiles.active 和spring.profiles.default只能写在主配置文件中
spring.profiles.active=production,hsqldb
# 包含环境
spring.profiles.include[0]=common
spring.profiles.include[1]=local
spring.profiles.include=common,local
# 生效的环境 = 激活的环境/默认环境  + 包含的环境
# 基础的配置mybatis、log、xxx:写到包含环境中;需要动态切换变化的 db、redis:写到激活的环境中
# 环境分组
spring.profiles.group.prod[0]=db
spring.profiles.group.prod[1]=mq
# 使用spring.profiles.active=prod ,就会激活prod,db,mq配置文件
Profile配置文件
优先级由高到低,前面覆盖后面
命令行 > 包外config直接子目录 > 包外config目录 > 包外根目录 > 包内目录
同级比较:
profile配置 > 默认配置
properties配置 > yaml配置

核心原理
Springboot生命周期

/**
 * Listener先要从 META-INF/spring.factories 读到
 *
 * 1、引导: 利用 BootstrapContext 引导整个项目启动
 *      starting:              应用开始,SpringApplication的run方法一调用,只要有了 BootstrapContext 就执行
 *      environmentPrepared:   环境准备好(把启动参数等绑定到环境变量中),但是ioc还没有创建;【调一次】
 * 2、启动:
 *      contextPrepared:       ioc容器创建并准备好,但是sources(主配置类)没加载。关闭引导上下文;组件都没创建【调一次】
 *      contextLoaded:         ioc容器加载。主配置类加载进去了。但是ioc容器还没刷新(bean没创建)。
 *      =======截止以前,ioc容器里面还没造bean=======
 *      started:               ioc容器刷新了(所有bean造好了),但是 runner 没调用。
 *      ready:                  ioc容器刷新了(所有bean造好了),所有 runner 调用完了。
 * 3、运行
 *     以前步骤都正确执行,代表容器running。
 */
如何监听生命周期:自定义SpringApplicationRunListener来监听事件;
- 编写
SpringApplicationRunListener实现类 - 在
META-INF/spring.factories中配置org.springframework.boot.SpringApplicationRunListener=com.example.springboot_study.config.Config,还可以指定一个有参构造器,接受两个参数(SpringApplication application, String[] args)
public class Config implements SpringApplicationRunListener {
    @Override
    public void starting(ConfigurableBootstrapContext bootstrapContext) {
        SpringApplicationRunListener.super.starting(bootstrapContext);
    }

    @Override
    public void environmentPrepared(ConfigurableBootstrapContext bootstrapContext, ConfigurableEnvironment environment) {
        SpringApplicationRunListener.super.environmentPrepared(bootstrapContext, environment);
    }

    @Override
    public void contextPrepared(ConfigurableApplicationContext context) {
        SpringApplicationRunListener.super.contextPrepared(context);
    }

    @Override
    public void contextLoaded(ConfigurableApplicationContext context) {
        SpringApplicationRunListener.super.contextLoaded(context);
    }

    @Override
    public void started(ConfigurableApplicationContext context, Duration timeTaken) {
        SpringApplicationRunListener.super.started(context, timeTaken);
    }

    @Override
    public void ready(ConfigurableApplicationContext context, Duration timeTaken) {
        SpringApplicationRunListener.super.ready(context, timeTaken);
    }

    @Override
    public void failed(ConfigurableApplicationContext context, Throwable exception) {
        SpringApplicationRunListener.super.failed(context, exception);
    }
}
// 他就会自动加载该类,并在相应的事件调用相应的函数
springboot事件
sprinboot除了有生命周期,还有事件机制,两者是同时运行的
和生命周期同样操作即可,这样可以监听所有的事件
public class MyListener implements ApplicationListener {
    @Override
    public void onApplicationEvent(ApplicationEvent event) {
        System.out.println(event);
    }
}
// spring.factories
// org.springframework.context.ApplicationListener=com.example.springboot_study.config.MyListener
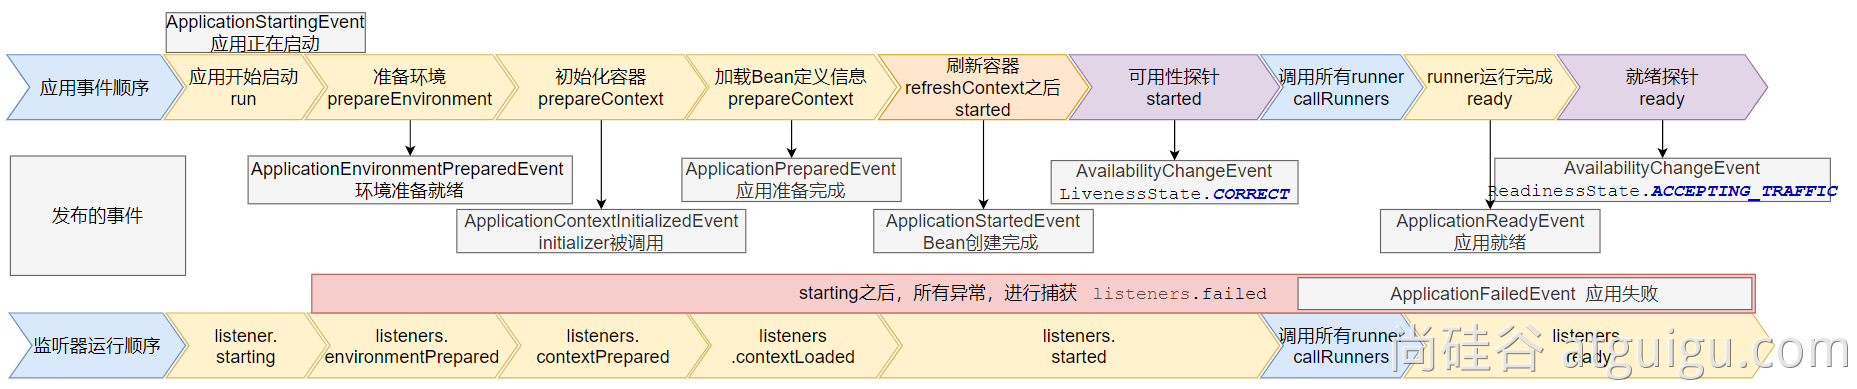
9大事件触发顺序&时机
ApplicationStartingEvent:应用启动但未做任何事情, 除过注册listeners and initializers.ApplicationEnvironmentPreparedEvent: Environment 准备好,但context 未创建.ApplicationContextInitializedEvent: ApplicationContext 准备好,ApplicationContextInitializers 调用,但是任何bean未加载ApplicationPreparedEvent: 容器刷新之前,bean定义信息加载ApplicationStartedEvent: 容器刷新完成, runner未调用
=========以下就开始插入了探针机制============
AvailabilityChangeEvent:LivenessState.CORRECT应用存活; 存活探针ApplicationReadyEvent: 任何runner被调用AvailabilityChangeEvent:ReadinessState.ACCEPTING_TRAFFIC就绪探针,可以接请求ApplicationFailedEvent:启动出错
自定义事件驱动开发
自定义事件
LoginSuccessEvent定义一个事件类,实现ApplicationEvent即可,只需要在该类中存储数据即可
定义事件发布者
这里可以选择实现ApplicationEventPublisherAware接口,也可以选择直接使用注解自动注入ApplicationEventPublisher
@Service
public class EventPublisher implements ApplicationEventPublisherAware {

    /**
     * 底层发送事件用的组件,SpringBoot会通过ApplicationEventPublisherAware接口自动注入给我们
     * 事件是广播出去的。所有监听这个事件的监听器都可以收到
     */
    ApplicationEventPublisher applicationEventPublisher;

    /**
     * 所有事件都可以发
     * @param event
     */
    public void sendEvent(ApplicationEvent event) {
        //调用底层API发送事件
        applicationEventPublisher.publishEvent(event);
    }

    /**
     * 会被自动调用,把真正发事件的底层组组件给我们注入进来
     * @param applicationEventPublisher event publisher to be used by this object
     */
    @Override
    public void setApplicationEventPublisher(ApplicationEventPublisher applicationEventPublisher) {
        this.applicationEventPublisher = applicationEventPublisher;
    }
}
事件订阅者
@Service
public class CouponService {

    @Order(1) // 	使用该注解,可以设置事件订阅者的处理优先级
    @EventListener
    public void onEvent(LoginSuccessEvent loginSuccessEvent){
        System.out.println("===== CouponService ====感知到事件"+loginSuccessEvent);
        UserEntity source = (UserEntity) loginSuccessEvent.getSource();
        sendCoupon(source.getUsername());
    }

    public void sendCoupon(String username){
        System.out.println(username + " 随机得到了一张优惠券");
    }
}
// 也可以选择实现接口
@Component
public class CouponService implements ApplicationListener<LoginSuccessEvent> {
    @Override
    public void onApplicationEvent(LoginSuccessEvent event) {
        System.out.println("Received custom event - " + event);
    }
}
触发事件
@Autowired
private EventPublisher eventPublisher;

public void sendEvent() {
    eventPublisher.sendEvent(xxxx);
}
SpringBootApplication
1、@SpringBootConfiguration
就是: @Configuration ,容器中的组件,配置类。spring ioc启动就会加载创建这个类对象
2、@EnableAutoConfiguration:开启自动配置
开启自动配置,包含下面两个注解
@AutoConfigurationPackage:扫描主程序包:加载自己的组件
- 利用
@Import(AutoConfigurationPackages.Registrar.class)想要给容器中导入组件。 - 把主程序所在的包的所有组件导入进来。
@Import(AutoConfigurationImportSelector.class):加载所有自动配置类:加载starter导入的组件
扫描SPI文件:
META-INF/spring/org.springframework.boot.autoconfigure.AutoConfiguration.imports,以前都是放在spring.factories文件中,现在单独抽取了一个自动配置类文件
3、@ComponentScan
组件扫描:排除一些组件(哪些不要)
排除前面已经扫描进来的配置类、和自动配置类。
@ComponentScan(excludeFilters = { @Filter(type = FilterType.CUSTOM, classes = TypeExcludeFilter.class),
      @Filter(type = FilterType.CUSTOM, classes = AutoConfigurationExcludeFilter.class) })
完整流程

自定义starter
创建
自定义starter项目,引入spring-boot-starter基础依赖编写模块功能,引入模块所有需要的依赖。
编写
xxxAutoConfiguration自动配置类,帮其他项目导入这个模块需要的所有组件编写配置文件
META-INF/spring/org.springframework.boot.autoconfigure.AutoConfiguration.imports指定启动需要加载的自动配置其他项目引入即可使用
1、配置映射
@ConfigurationProperties(prefix = "robot")  //此属性类和配置文件指定前缀绑定
@Component
@Data
public class RobotProperties {
    private String name;
    private String age;
    private String email;
}
倒入配置提示包
<!--        导入配置处理器,配置文件自定义的properties配置都会有提示-->
<dependency>
    <groupId>org.springframework.boot</groupId>
    <artifactId>spring-boot-configuration-processor</artifactId>
    <optional>true</optional>
</dependency>
2、编写业务代码
3、编写RobotAutoConfiguration类
这里建议采用@EnableConfigurationProperties(RobotProperties.class),然后在RobotProperties类中不使用@Component注解了
@Import({/*导入所有的bean*/})
@Configuration
public class RobotAutoConfiguration {
  // 也可以使用@bean导入
}
到这一步,就可以在别的工程中引入改starter,然后使用@Import注解导入RobotAutoConfiguration配置类即可
但这样太麻烦
添加@Enablexxx机制
创建自定义注解,自己导入
RobotAutoConfiguration配置类
@Retention(RetentionPolicy.RUNTIME)
@Target({ElementType.TYPE})
@Documented
@Import(RobotAutoConfiguration.class)
public @interface EnableRobot {

}
使用的时候加上一个@EnableRobot注解就好了,这样仍然很麻烦,下面做到自动化
依赖SpringBoot的SPI机制
创建META-INF/spring/org.springframework.boot.autoconfigure.AutoConfiguration.imports 文件,编写好自动配置类的全类名即可
项目启动,自动加载自动配置类 perfect